April 2022, Frank Brines
Rose Care FUNdamentals – April 2022

Frank Brines
ARS Master Rosarian
Many gardeners are having (or are about to have) their first flush of blooms. Climate change is influencing the weather and affecting the accustomed pruning schedule. The erratic temperatures also have a bearing on the growth of our plants. Roses didn’t stop growing this past winter.
Even so, I have buds opening on the bushes that got pruned on schedule. Now the conditions for fungi are present, and rust and/or mildew which will need control with fungicides—and even stripping infected leaves if the infestation is heavy. I have had reports of rust and thrip activity in some areas, so inspect for these daily. The prediction for higher than normal temperature for the next two weeks may help with fungi problems. Other things to watch for are rose mosaic virus, black spot and Anthracnose.
If you want the fullest blooms possible, supply plenty of water to your plants, but don’t flood them. For larger blooms, apply greater amount of water when buds begin to swell and show color. But pay attention to the drainage of your soil—roses like plenty of water but they don’t respond well to soggy soil. The optimum time to irrigate is early in the day.
Roses love food. Preferably good quality food on a regular basis. Not all fertilizers include all the micro/macro nutrients needed, so read the label on the packaging. Alternating the major fertilizer with fish emulsion every 2 weeks will help provide some of the micro nutrients. As I always say, organics are much better for your soil and ultimately for your garden and the environment. I’m told that sprinkling 1 cup of Epsom Salt (Magnesium of Sulfate) around large size plants, ½ cup for smaller plants, once in Spring and once in Fall can assist in getting new basal breaks (new canes from the bud union). I’ve done this many times but I’m not sure it works!
The soil needs a supply of organic material such as humus incorporated into the depths. That isn’t easily accomplished in established gardens, however adding a 3 – 4 inches of a good composted mulch over the entire garden, leaving a 12” diameter circle open around base of each bush will go a long way to enriching your soil overall because over time earthworms help transport that mulch down into the soil where the microbiology is complex and multi-tiered.
A healthy garden soil system is teeming with beneficial microbes that inhibit, compete with, and consume disease-causing organisms. This creates a sustainable soil “immune system.” In fact, plants grown with organic fertilizers are themselves more resistant to pests and diseases. In addition, when you feed those beneficial organisms, they feed your roses. That’s because they are busy breaking down organic matter and releasing mineral nutrients slowly and reliably. I’ve recently learned that extra phosphate in the fertilizer that you use is most important in assisting in creating a soil environment that aids immensely in helping plants to be resistant to pest and diseases. Also helping plants to develop hardier root systems and larger blooms.
Many gardeners become discouraged when they first experiment with organic treatments while still using chemical fertilizers. It is difficult—in fact, almost impossible—to have it both ways. Chemical fertilizers negatively impact the soil food web by poisoning entire portions of it. The fact is, chemical fertilizers are salts! What gardener hasn’t seen what table salt does to a slug or snail? Salts absorb water and dehydrates the soil microbes which are the foundation of the soil nutrient system. Once you’ve used chemical fertilizers regularly you must keep adding more because the soil microbiology is weakened and unable to do its job of releasing naturally available nutrients to your plants.
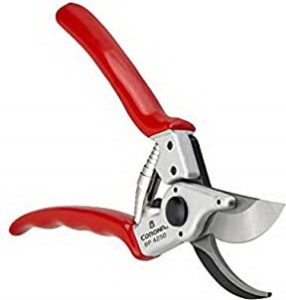
Bypass Pruners
What does “bypass” mean? Compare your pruners to the image shown above: Bypass pruners have a sharp cutting blade (which slices through the cane) and a dull curved non‑cutting blade (which holds the cane in place during the cut). The sharp blade “by passes”, or over shoots, the dull curved blade. This is in contrast to an “anvil” pruner which has a straight blade that comes down on a straight bar.
Follow these steps to get your tools ready:
- Lubricate the moving parts with a little light oil (such as 3-in-1 oil), and make sure they operate without resistance.
- Clean all tools with rubbing alcohol before and during the job. It helps prevent transmitting diseases from plant to plant and you can use it as first aid for punctures and scratches to your skin.
- Sharpen each blade with a small diamond file (available at garden centers), trying as much as possible to match the original bevel of the blade. Every 100 cuts or so, swipe the file over the blade a few times to keep it sharp. If you notice that your pruners are crushing the stems and/or leaving a “tail” (a small strip of tissue sticking up from the cut) then it’s past time to sharpen them!
Gross Pruning
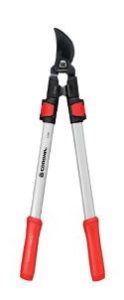
For all cuts, orient your pruners or lopper so that the non‑cutting blade is in contact with the portion of the cane that will be removed, and the cutting blade is on the side of the cut that will remain on the plant. (See “Blade Orientation” below right.) This will make more sense when you are actually holding the pruners and getting ready to cut!
A word of caution when gross pruning: Look for the small nests of hummingbirds, as this is the nesting period for two varieties in our area. Also, if you discover praying mantis egg cases on any branches you remove, find a place to put them where they will be undisturbed and hatch out so you can benefit from the offspring!
- In Southern California our rose bushes can grow quite large, so start with some gross pruning to bring the project down to size. I use loppers to cut every bush down to about 3 – 4 feet high.
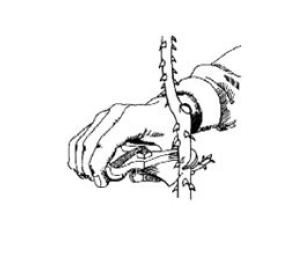
- Next, remove all the leaves from the plant and discard into green waste bin. This removes diseased material and helps you see the structure clearly.
- Use your hand pruners or loppers to remove canes that are twiggy, dead, crossing other canes, or passing through the center of the plant.
Fine Pruning
After removing all that stuff from the interior of the bush, you’re ready to do your fine pruning. Apply these guidelines:
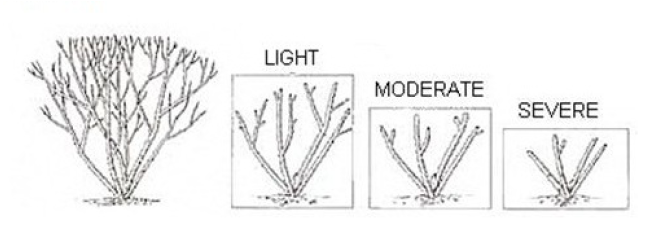
- Prune each cane down to a height you feel comfortable with, likely between 12″ and 24″ tall. (See “Pruning Styles” image below.)
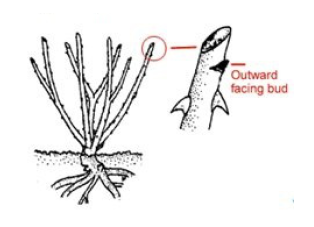
- When pruning a cane, make an angled cut about half an inch above an outward facing bud. (See “Outward Facing Bud” image below.) This ensures that the stem grows away from the center of the plant. Note that there are always one to three buds wherever a leaf met the cane; outward-facing buds tend to be about 4″ apart. If you prune lightly to moderately—that is, if you keep your canes a little longer rather than shorter—and if frost damages the tender young growth, then you can still re‑prune to the next bud down.
- Attempt to end up with a domed top to the degree possible so the plant will bush out in a pleasing, balanced manner.
Clean and Feed
- Clean the ground thoroughly of all rose debris and dispose of all cuttings and other materials in your green waste bin and put it on the street: Do not compost it!
- Asses the irrigation system for any needed repairs while there is no new growth and mulch has not been spread.
- Apply a dormant spray to the plants and the soil surface to ward off diseases. Then apply 2″ to 4″ of composted mulch to cover the entire garden area.
- The first fertilizing will be when new growth is about 2 inches long. I recommend lower values of the three elements (Nitrogen [3], Phosphate [4],K Potassium [3]) with slightly higher value for Phosphate.
- Two weeks later, begin with heavier feeding every 2 weeks for great blooms or at least monthly.

Frank Brines
ARS Master Rosarian
I am an ARS Master Rosarian. If you would like personal answers to rose questions you can leave them on the TVRS website or email me at roseguy2000@aol.com.
